This post is divided into several chapters. Feel free to jump right into the topic which interests you most.
Intro
I took last Christmas as the opportunity to upgrade our home network. Shortly after we moved into our new apartment which has Ethernet wired into every room, plus a small cabinet in the hallway where all connections are terminating. This was my opportunity to improve the not statisfying experience with the default router provided by our internet provider. We had WiFi outages almost every day and even wired connections were slower than expected. I read about different routers and access points and decided to go with Ubiquiti, basically due to their popularity and good reviews. I went with the following components (parts of them being my Christmas gift, yeah!):
- Ubiquiti EdgeRouter X (which I bought used on Ebay due to the chip shortage)
- Ubiquiti Access Point WiFi 6 Lite
- Netgear GS308E Managed Switch 8 Port (I use the managed version because I use VLANs to set up different networks)
The idea was to create three different networks. They are separated from each other via firewall rules:
- Home – no restrictions (and potentially access to other devices on the other networks)
- Guest – devices shouldn’t be able to discover & communicate with other devices on the network
- Work – no restrictions on the network itself expect devices should not be able to access the router and DNS server. No access to devices in the other networks.
On the guest network, connected devices won’t have access to devices likeour Chromecast or the NAS device. I use a PiHole as DNS server for all three networks to reduce tracking and ads.
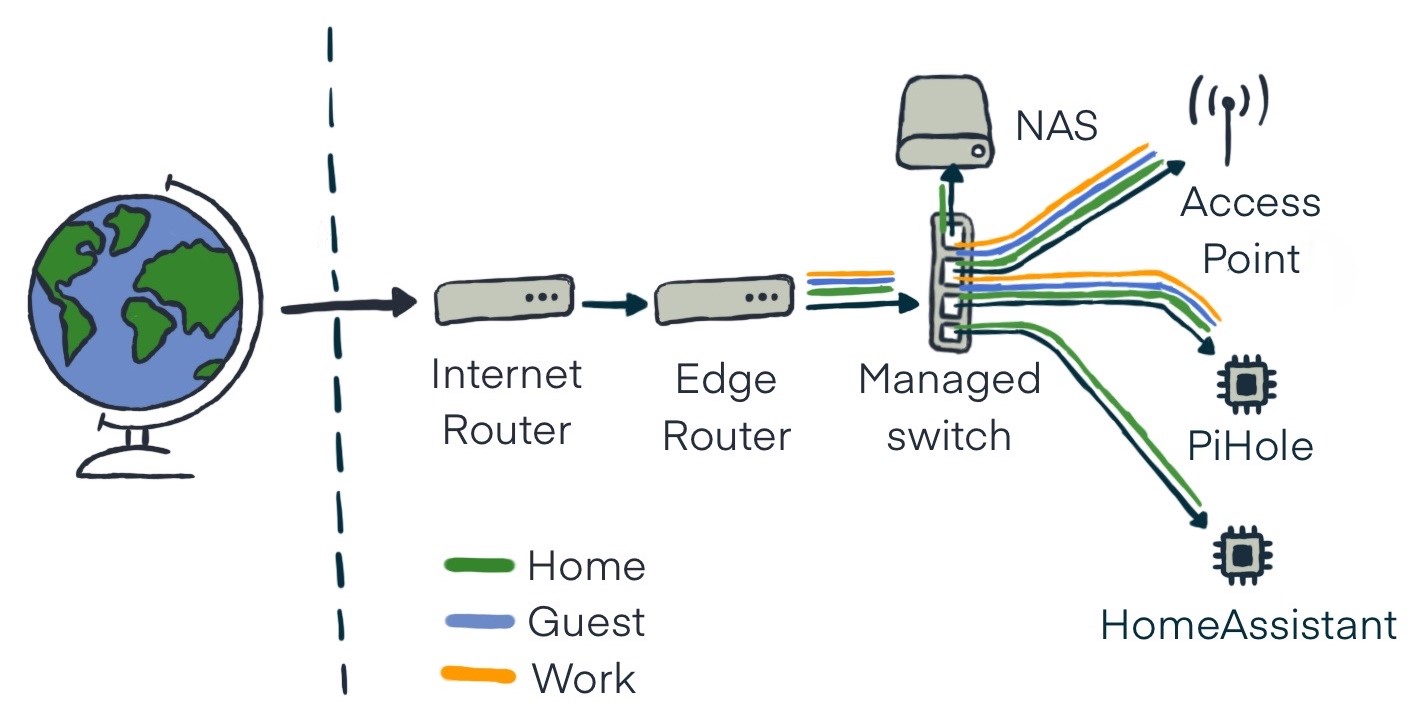
The general setup looks like the following.
The EdgeRouter is plugged into the Internet Router provided by our internet provider. My Synology NAS, the Access Point (via PoE injector), a Raspberry Pi running PiHole, and a second Raspberry Pi running HomeAssistant are plugged in the switch. As a bonus, I have an Ethernet connection to the home office, which is currently unused.
Setup Ubiquiti EdgeRouter X
Using the wizard to initially set up the router is straightforward by picking “Basic setup”. On my setup, internet is plugged in on interface eth0. Make sure to create a user during the setup. The system groups the ports and names the group “switch 0”. After clicking “Apply” the router is ready for basic usage and working if connected to the internet. The wizard creates a local network, DHCP server, firewall configurations and more.
As a first step, you need to create three different VLANs to differentiate between separate tags on the devices.
| Name | VLAN ID | Network Range |
| home | 10 | 192.168.10.1/24 |
| guest | 20 | 192.168.20.1/24 |
| work | 30 | 192.168.30.1/24 |
On the EdgeRouter interface click on “Add Interface > Add VLAN”. Perform this step for every network.
- Enter the number of the VLAN ID
- Select “switch 0” as interface
- Set the network name in the description field
- For address choose “Manually define IP address” and type in the provided IP address range
- Save the configuration
In the end, you have three different new interfaces switch0.10, switch0.20, and switch0.30. Afterward, you need to create a DHCP server for each network. Click on “Services > Add DHCP server” and repeat the steps for all networks.
- put in the DHCP name (e.g. home_dhcp)
- set the subnet size. It’s important that the subnet address ends with 0, for example 192.168.10.0/24 for the home network
- for DNS server put in the IP address of the PiHole or router address
- Range starts at “2” and stops at “255”
- Set router address to xxx.xxx.xxx.1
If you chosse to you use the EdgeRouter as DNS resolver you need to add DNS forwarding for each interface. Click on “Services > DNS” and add the previously created interfaces.
To block local communication, you have to create two Firewall/NAT groups. One for the RFC1918 address space and one for the IP address range of the work network. Click on “Firewall/NAT > Firewall/NAT Groups > Add Groups” and add the groups with the following details.
| Name | LAN_Networks | WORK_Group |
| Description | RFC1918 Ranges | WORK Group Ranges |
| Network | 10.0.0.0/8 172.16.0.0/12 192.168.0.0/16 | 192.168.30.0/24 |
The next and final step on the EdgeRouter is to set up the firewall for each network. Click on “Firewall/NAT > Firewall Polices > Add Ruleset”. For each network, you need to define rules for in- and outgoing traffic. Since there are no restrictions on the home network, you don’t need a firewall here. Keep in mind that the rules are evaluated in the order they’re in. At the end of the post in the resource section are the exact configuration details.
GUEST_IN – handles incoming traffic for the guest network
- Default action: accept
- interface: switch0.20/in
- rule: allow established/related, block access to group LAN_Networks
GUEST_LOCAL – handles local traffic for the guest network
- Default action: drop
- interface: switch0.20/local
- rule: allow established/related, allow DNS (to PiHole) & DHCP, block local access to group LAN_Networks
WORK_IN – handles incoming traffic for the work network
- Default action: accept
- interface: switch0.30/in
- rule: allow established/related, block access to group LAN_Networks
WORK_LOCAL – handles local traffic for the work network
- Default action: drop
- interface: switch0.30/local
- allow established/related, allow DNS (to PiHole) & DHCP, block access to router, allow local access to group WORK_Group, block local access to group LAN_Networks
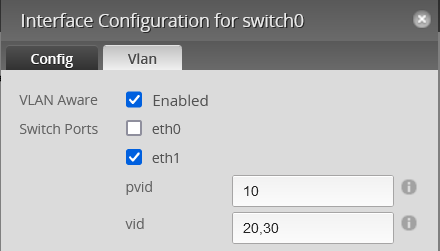
The EdgeRouter needs to be configured that on eth1, where the switch is plugged in pvid is 10 and vids are 20 and 30. Home network packages delivered to this interface will be untagged and the other two will be tagged. This allows all the devices plugged into the switch which don’t differentiate between tags to the home network without tag configuration. In my case, the Synology NAS, and both Raspberry Pi’s for PiHole and Home Assistant are connected via Ethernet to the switch without any configuration change on the devices.
You need to set Hardware Offloading to use the Router with 1 Gbit/s. It increases throughput. Enable hwnat and ipsec. You can do this either via the CLI at the web interface or log in via SSH.
configure

set system offload hwnat enable
set system offload ipsec enable

commit ; save
Setup Ubiquiti Access Point WiFi 6 Lite
To configure the access point, I use the Unifi Controller for Windows. The Access point is plugged into the switch. I planned on using the POE feature of the router to power the Access Point. When I set it up the first time, I was disappointed. The router doesn’t deliver enough power for the Access Point. It needs to be powered by 802.3af PoE (up to 12,95 Watt). I bought a PoE Injector to power the Access point, which is now plugged between the switch and Access Point.
Because I have a managed switch, all three networks are accessible. I made no changes to the managed switch itself. Remember the home network packages are untagged in this configuration. To set up the access point, you need to create three different networks on the Ubiquiti controller. Click on “Settings > Networks > Add Network”. Repeat the step for each network. For guest and work network put in the corresponding VLAN ID.
- guest network, VLAN ID = 20
- work network, VLAN ID = 30
As a final step create a WiFi configuration for each controller network. Click on “Settings > WiFi > Add New WiFi Network”. Choose your WiFi name, password and select the network you want to apply. Depending on your setup change other settings if necessary.
Setup PiHole
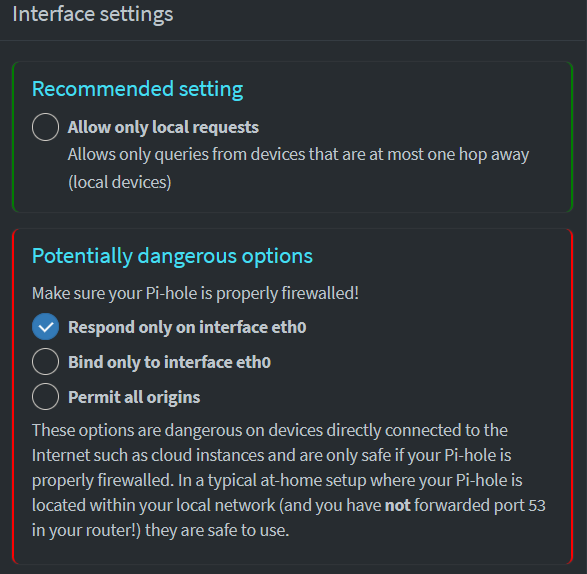
The network setup is almost complete. Connecting to the home network and accessing the internet should already work. All left to do is set up the PiHole for access from different networks. All three networks use the PiHole in the home network as DNS server (as configured in the DHCP settings). Therefore as a last and final step, you need to allow requests from these networks by allowing all responses from the interface eth0 on the Raspberry Pi. Click on “Settings > DNS > Respond only on interface eth0”.
Additionally, I created DNS records for all devices which I access frequently. These include PiHole (http://pi.hole), my NAS (http://synology.nas), home assistant (http://home.control because who wants type assistant all the time) and OctoPrint (http://octo.print) for my 3D printer.
Conclusion
Setting up my own network taught me a lot about networking and how different components work together. This alone would have been worth going through the trouble. But in addition, we now enjoy our improved WiFi experience with higher bandwidth and fewer interruptions (plus fewer ads due to PiHole as DNS server).
Resources
Following are the firewall policies for guest and work network.
-----------------------------------------------------------------------------
IPv4 Firewall "GUEST_IN":

 Active on (switch0.20,IN)


rule  action   proto
----  ------   -----
1     accept   all
  condition - state RELATED,ESTABLISHED

2     drop     all
  condition - state INVALID

3     accept   tcp_udp
  condition - daddr 192.168.10.17 tcp dpt:domain

4     drop     all
  condition - match-set LAN_Networks dst

10000 accept   all
-----------------------------------------------------------------------------
IPv4 Firewall "GUEST_LOCAL":

 Active on (switch0.20,LOCAL)


rule  action   proto
----  ------   -----
1     accept   all
  condition - state RELATED,ESTABLISHED

2     drop     all
  condition - state INVALID

3     accept   tcp_udp
  condition - daddr 192.168.10.17 tcp dpt:domain

4     accept   udp
  condition - daddr 192.168.20.1 udp dpt:bootps

5     drop     all
  condition - match-set LAN_Networks dst

10000 drop     all
-----------------------------------------------------------------------------
IPv4 Firewall "WORK_IN":

 Active on (switch0.30,IN)


rule  action   proto
----  ------   -----
1     accept   all
  condition - state RELATED,ESTABLISHED

2     drop     all
  condition - state INVALID

3     accept   tcp_udp
  condition - daddr 192.168.10.17 tcp dpt:domain

4     drop     all
  condition - match-set LAN_Networks dst

10000 accept   all
----------------------------------------------------------------------------
IPv4 Firewall "WORK_LOCAL":

 Active on (switch0.30,LOCAL)

rule  action   proto
----  ------   -----
10    accept   all
  condition - state RELATED,ESTABLISHED

20    drop     all
  condition - state INVALID

30    accept   tcp_udp
  condition - daddr 192.168.10.17 tcp dpt:domain

40    accept   udp
  condition - daddr 192.168.20.1 udp dpt:bootps

50    drop     all
  condition - daddr 192.168.30.1

60    accept   all
  condition - match-set WORK_Group dst

70    reject   all
  condition - match-DST-NTWRK-GROUP LAN_Networks reject-with icmp-port-unreachable

10000 drop     all