I was looking for a solution to monitor air quality in our apartment and connect it to Home Assistant. I wanted to measure
- C02
- Temperature
- Humidity
- Air particles
I couldn’t find any device which fit my requirements so I built it myself with the ESPHome Add-on from Home Assistant. As a microcontroller, I chose the Wemos D1 mini due to its compact form factor. I found a case for electronics on AliExpress which I used for this project.

Next, it was time to decide on sensors. Since I was planning to use ESPHome I was looking at available integrations and decided on these two sensors.
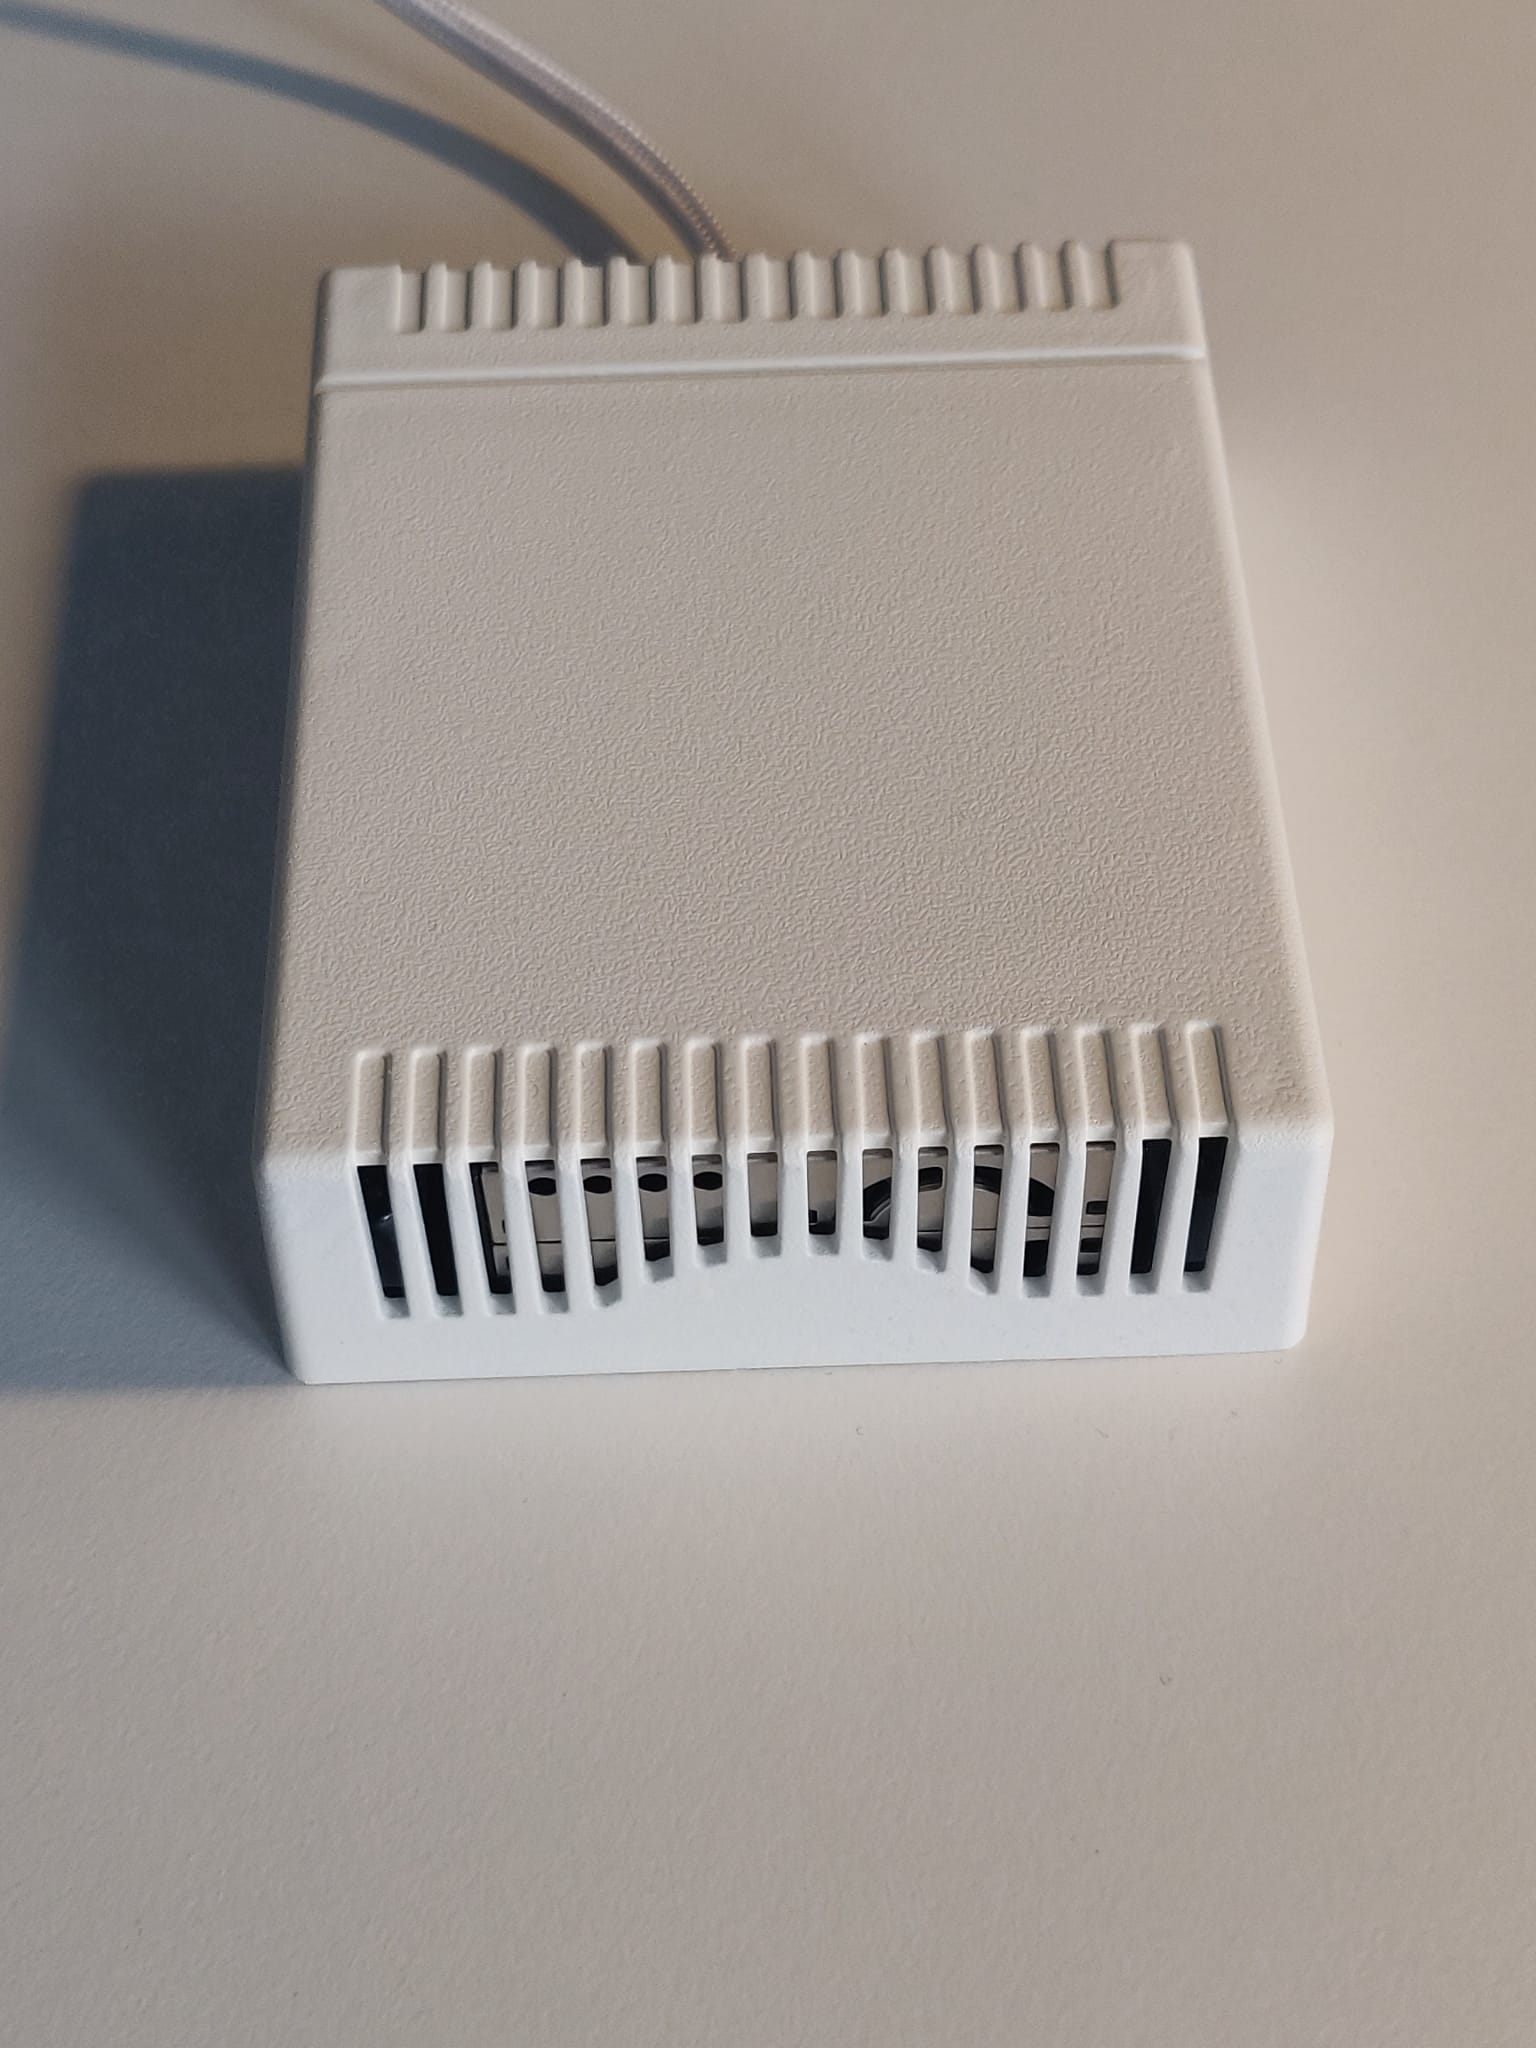
The finished sensors look minimalistic and I placed one in every room in our apartment.
Electrical setup
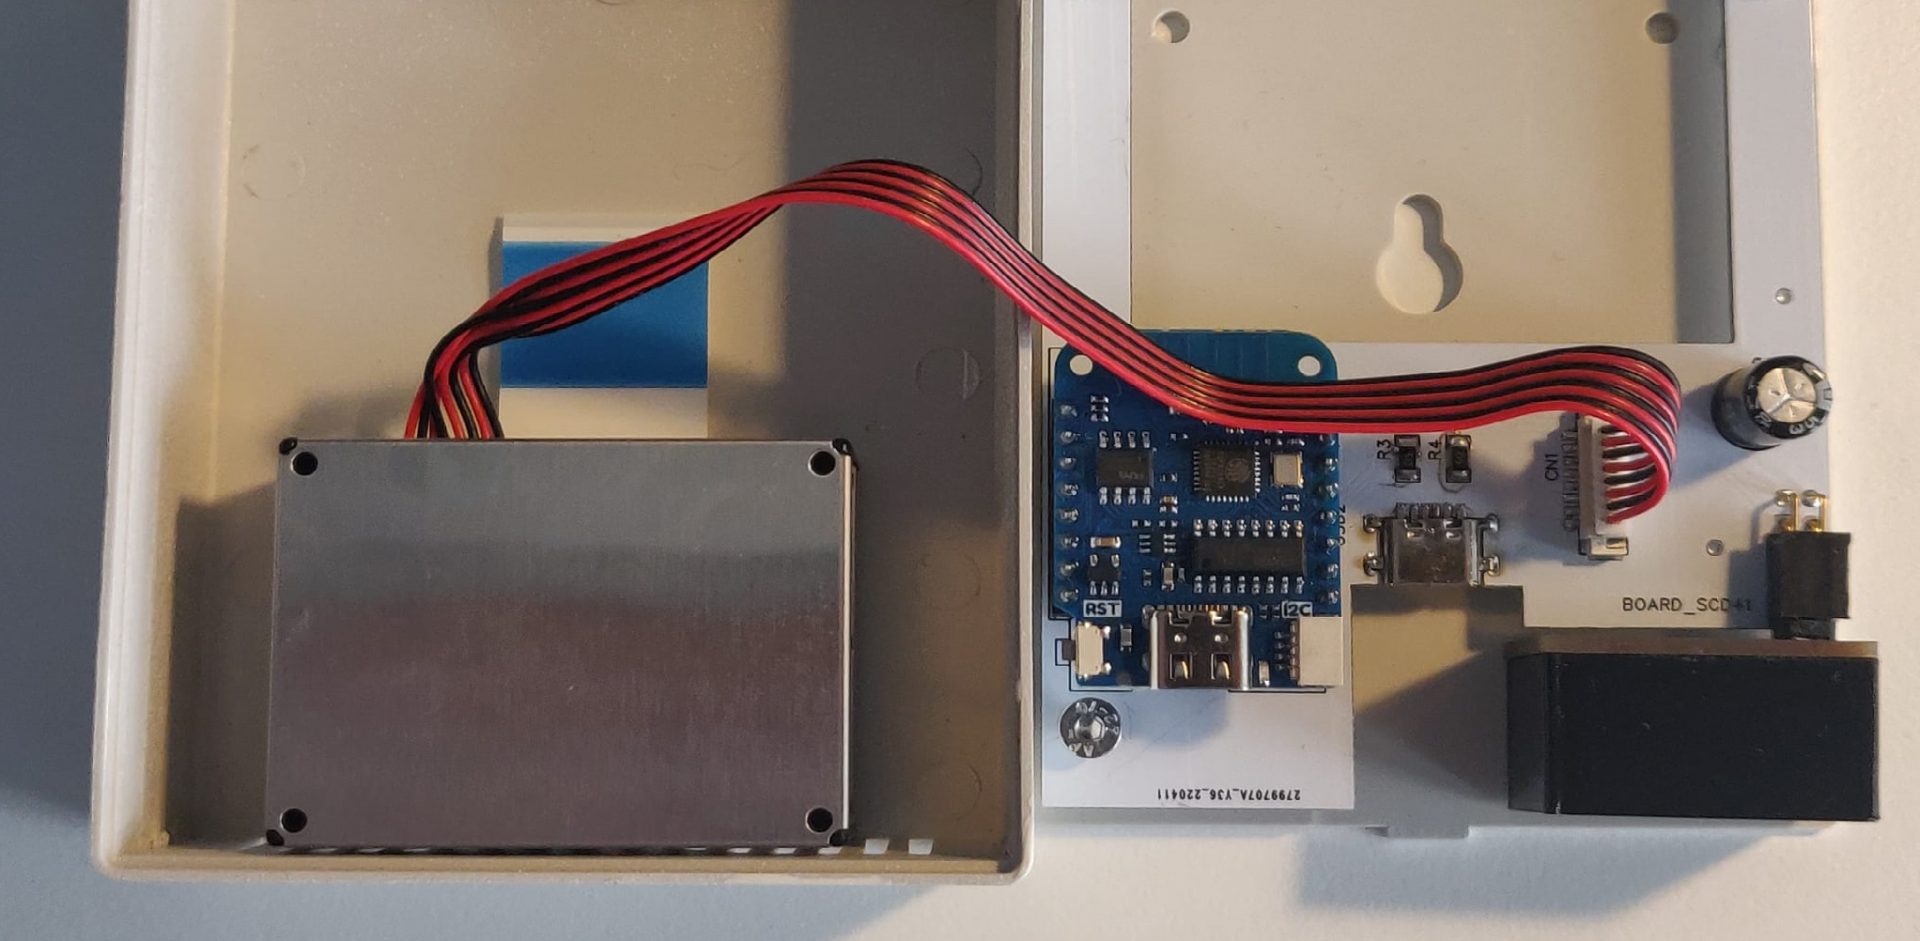
To mount everything nicely in the case I designed two custom PCBs – one for mounting the microcontroller and a second one to keep the SCD41 close to one of the outlets of the case. The placements of the sensors are important.
The PMS5003 is facing one side which allows it to get fresh air for constant measurements and the SDC41 is facing the other direction. According to the documentation it should not be placed with lots of air moving. The PMS5003 is glued in with a poster strip which adds additional damping from the moving fan.
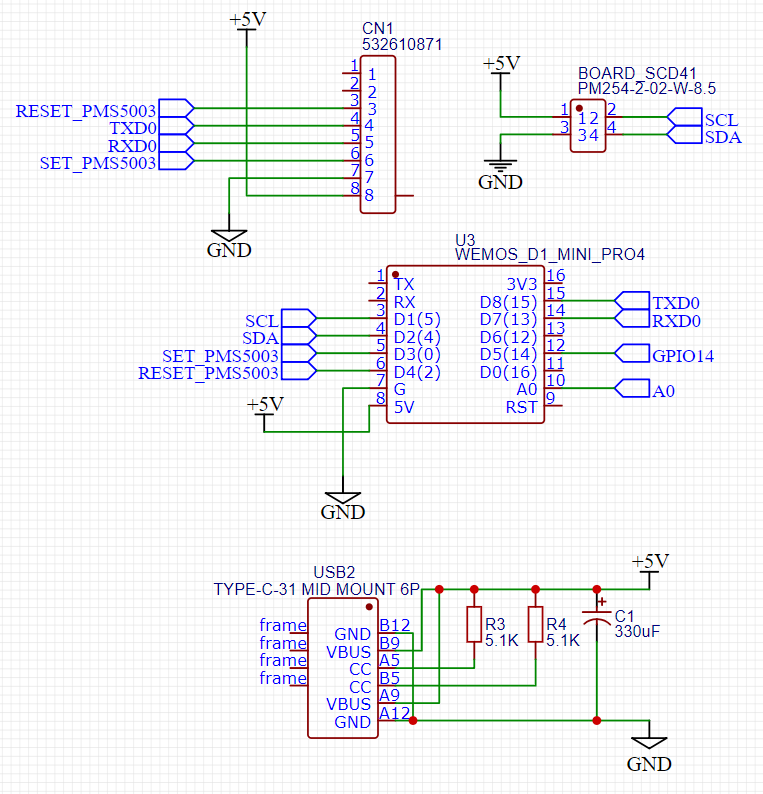
The main PCB holds the Wemos D1 mini and connectors for each sensor. The PMS5003 uses UART for communication (RX0 and TX0 pins). Everything on the board is powered with 5 Volt via USB Type C. The USB connection only provides power and does not connect with the Wemos D1 mini for any kind of communication. To provide voltage two resistors are needed otherwise no power is delivered. Once everything is set up and connected any software changes can be made over the air (OTA) in ESPHome.
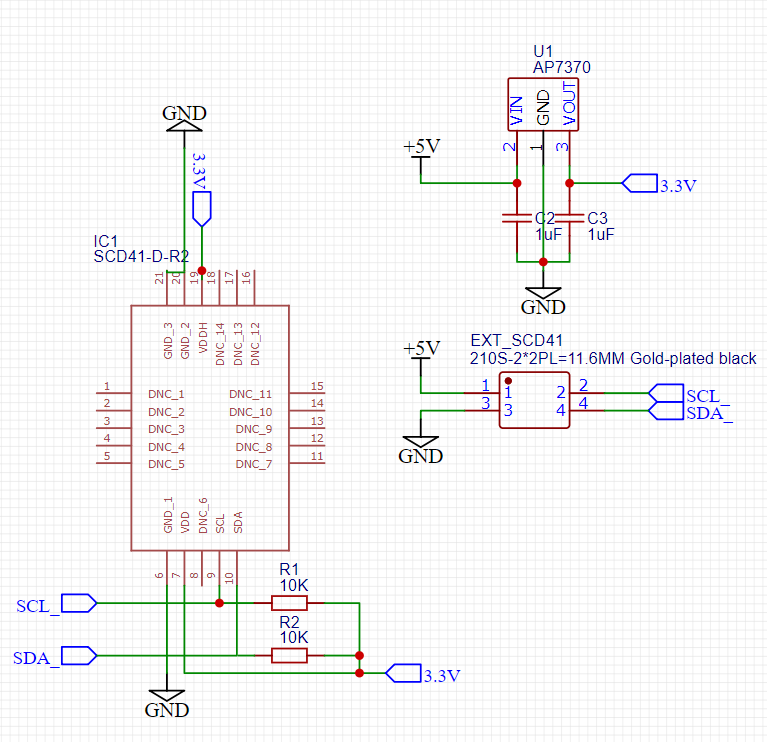
The second PCB has the connector block to the main board and holds the SCD41 sensor plus a voltage regulator to reduce voltage spikes and bring down the voltage to 3.3V. I had both PCBs manufactured and shipped. This was my first time soldering surface components since the SCD41 is only available for this kind of soldering. It was fun and challenging at the same time. I bought a heated platform and solder paste and was expecting some errors along the way. But soldering worked great and I only had to redo one board.
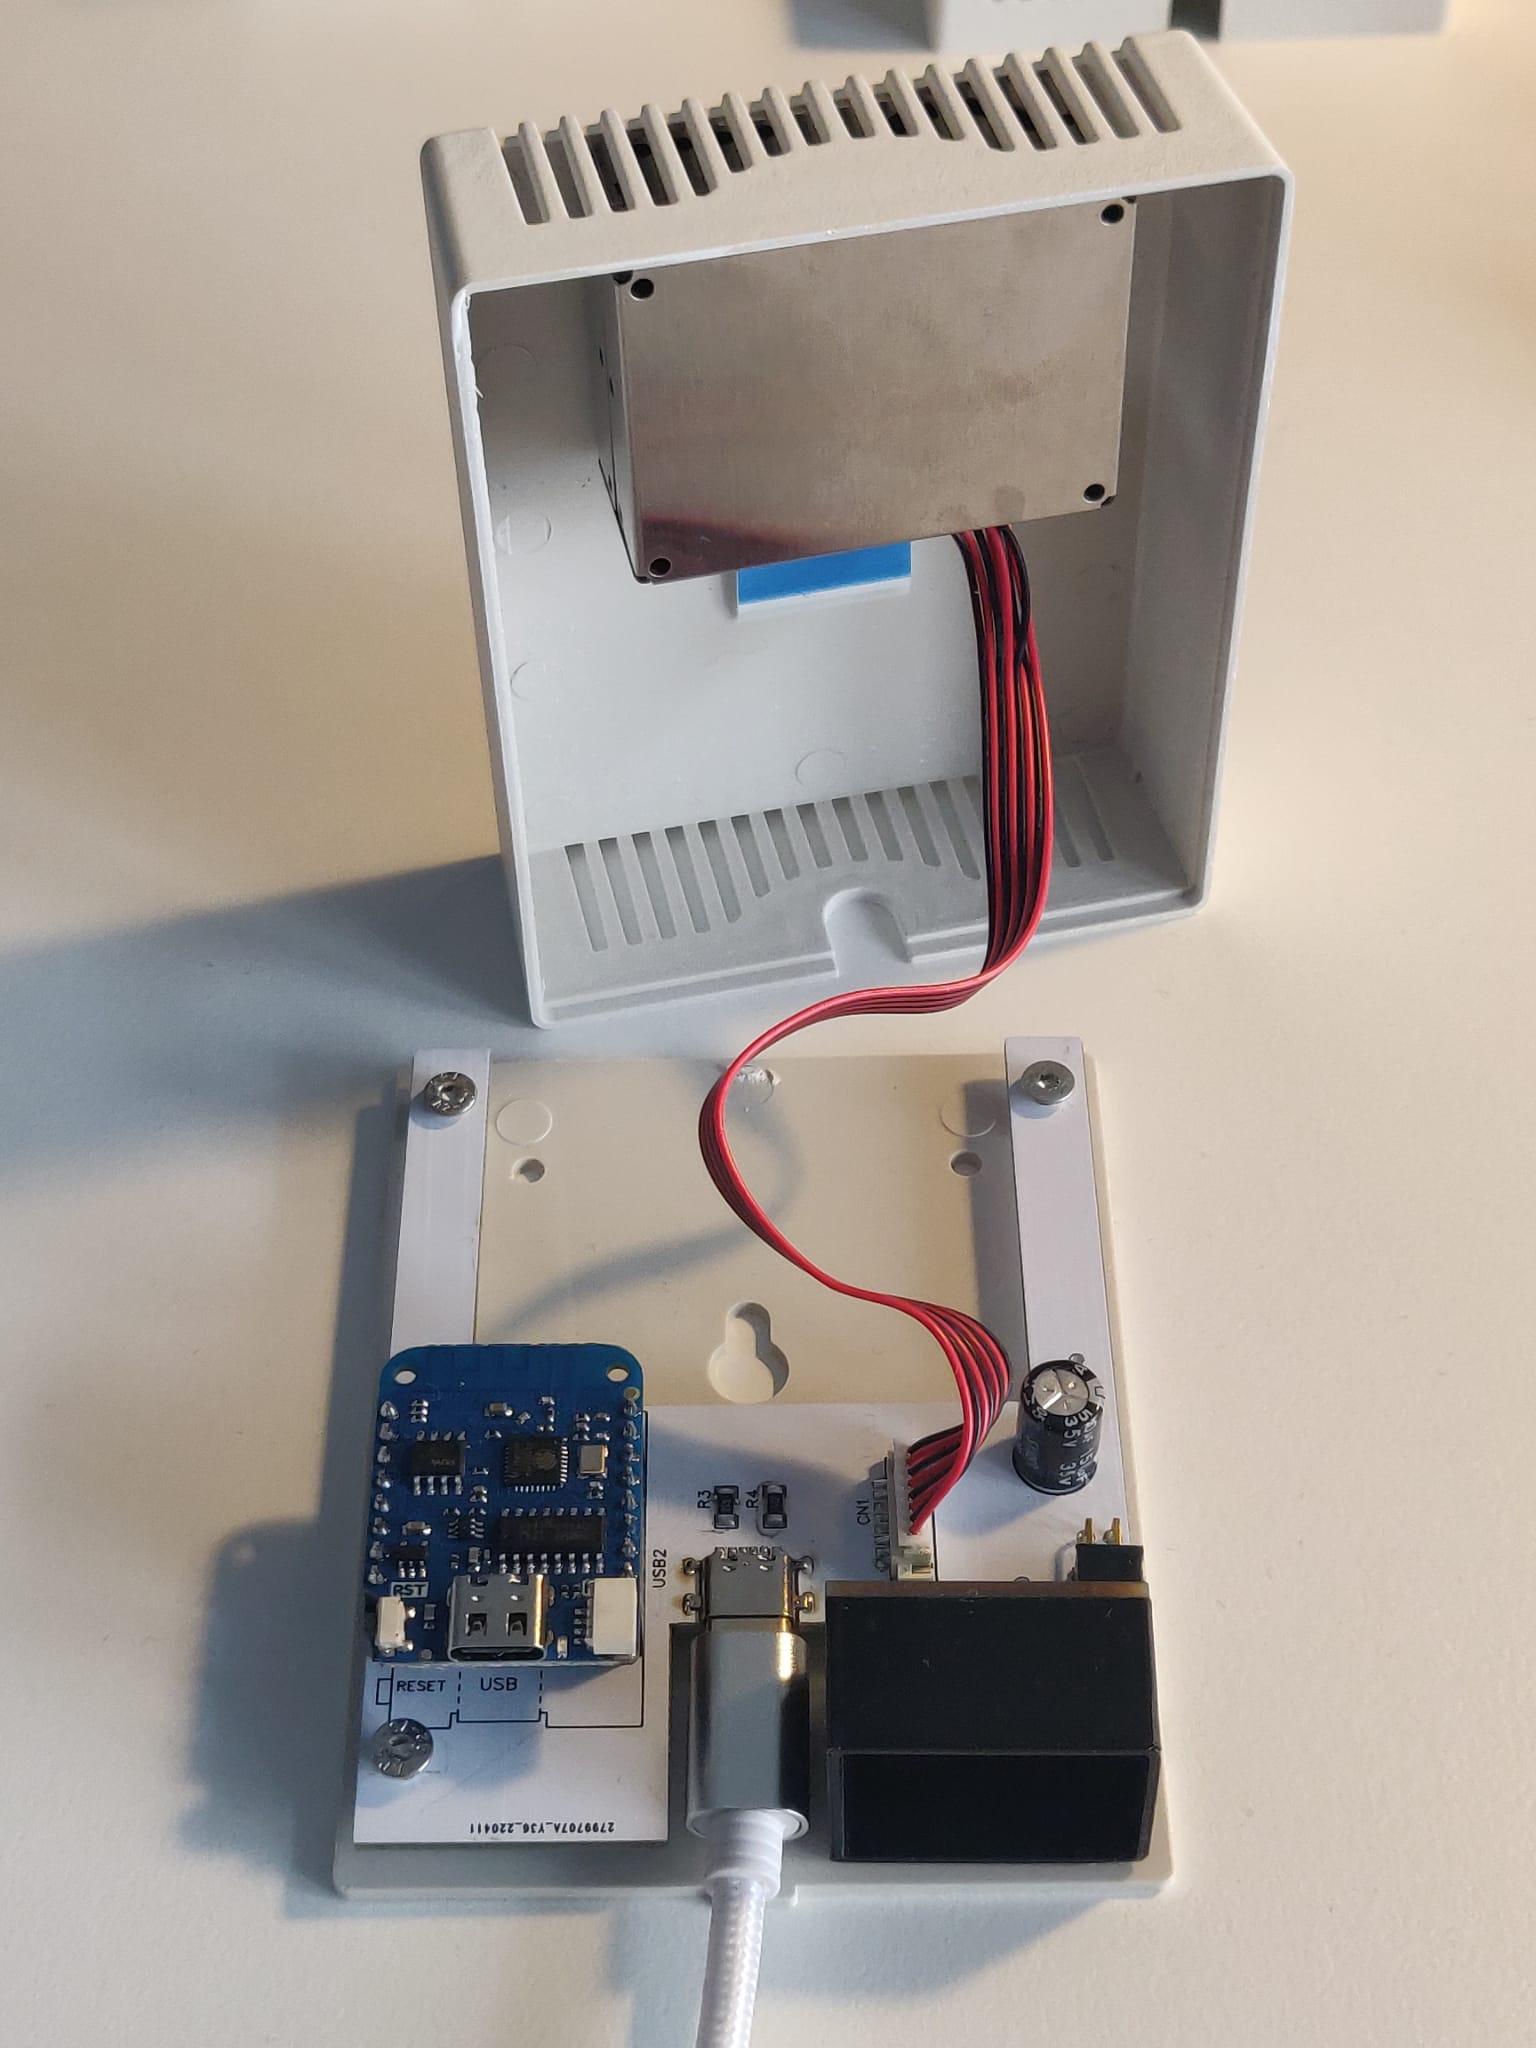
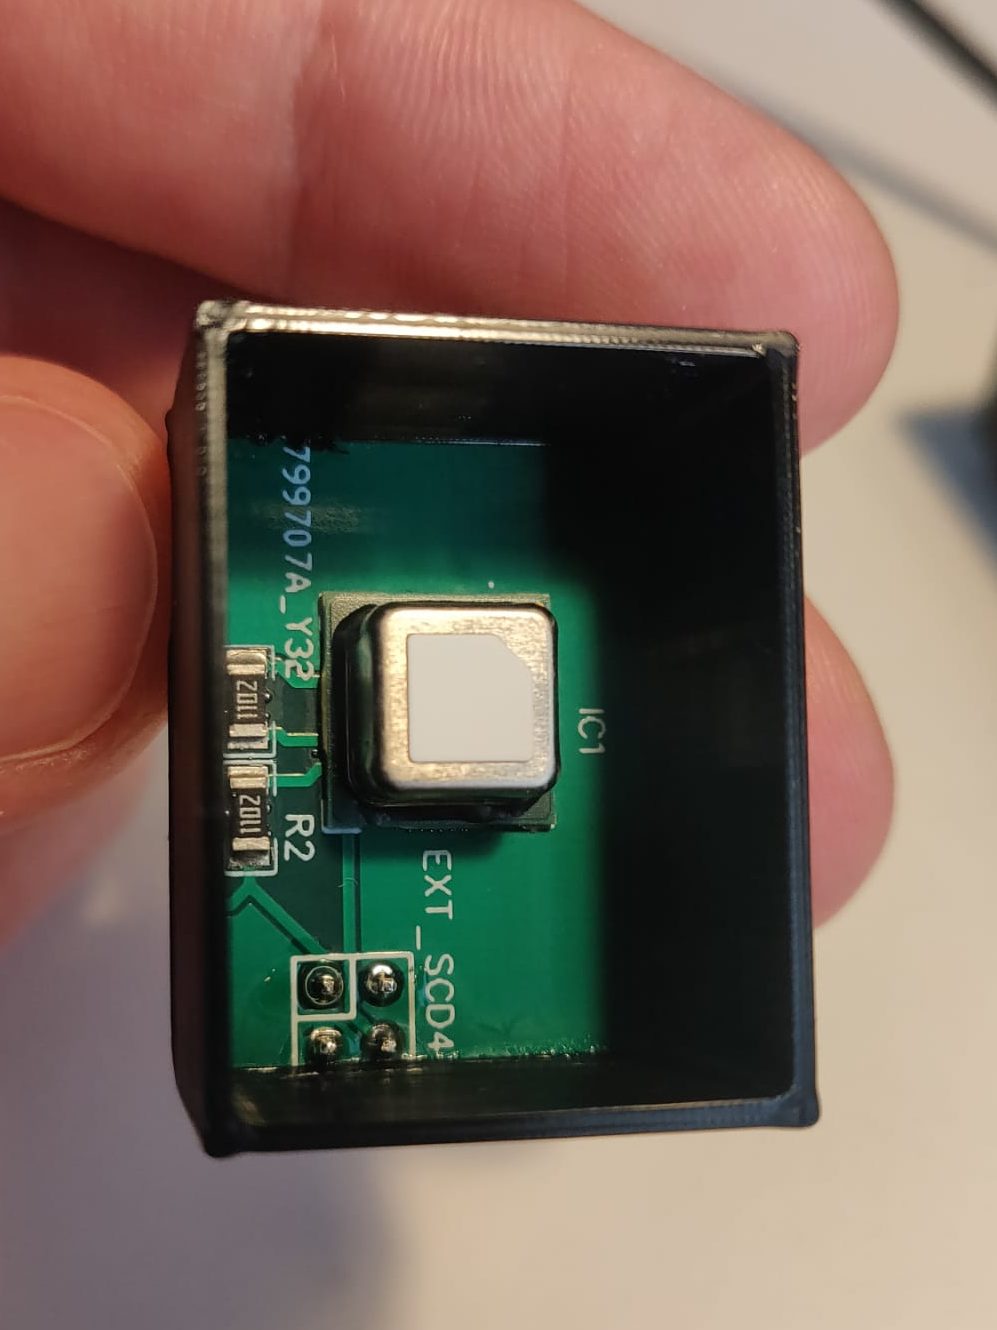
I 3D printed a case for the SCD41 sensor to protect it from any air movement and glued it onto the PCB. Then it was time to upload the software to the Wemos D1 mini and configure ESPHome.
Configuration
There are different configuration parameters:
- WiFi – connect to the local network
- I2C – communicate with SCD41
- UART – communicate with PMS5003
- sensors, one entity for each sensor type
- switch/interval – The laser in the PMS5003 lasts 30.000 hours or 3.5 years and I increase the lifetime to up to 18 years. I turn it on every 120 seconds for 30 seconds by setting the SET pin to low which puts the PMS5003 in sleep mode.
As soon as the configuration is uploaded to the D1 mini the air sensor will show up as a device in Home Assistant.
Here is the exact configuration running on all of my sensors.
esphome:
  name: air-sensor-1

esp8266:
  board: d1_mini

# Enable logging
logger:

# Enable Home Assistant API
api:

ota:
  password: "********"

wifi:
  ssid: !secret wifi_ssid
  password: !secret wifi_password

  # Enable fallback hotspot (captive portal) in case wifi connection fails
  ap:
    ssid: "Air-Sensor-1 Fallback Hotspot"
    password: "********"

i2c:
  sda: GPIO4
  scl: GPIO5
  scan: true

uart:
  tx_pin: GPIO13
  rx_pin: GPIO15
  baud_rate: 9600

sensor:
  - platform: pmsx003
    type: PMSX003
    pm_1_0:
      name: "air_sensor_1_1.0µm_concentration"
    pm_2_5:
      name: "air_sensor_1_2.5µm_concentration"
    pm_10_0:
      name: "air_sensor_1_10.0µm_concentration"
  - platform: scd4x
    co2:
      name: "air_sensor_1_CO2"
    temperature:
      name: "air_sensor_1_temperature"
    humidity:
      name: "air_sensor_1_humidity"

switch:
  - platform: gpio
    pin:
      number: GPIO0
    id: pms_set
    name: "start measuring"

status_led:
  pin:
    number: GPIO2
    inverted: true

interval:
  - interval: 120s
    then:
      - switch.turn_on: pms_set
      - delay: 30s
      - switch.turn_off: pms_set
Graphs
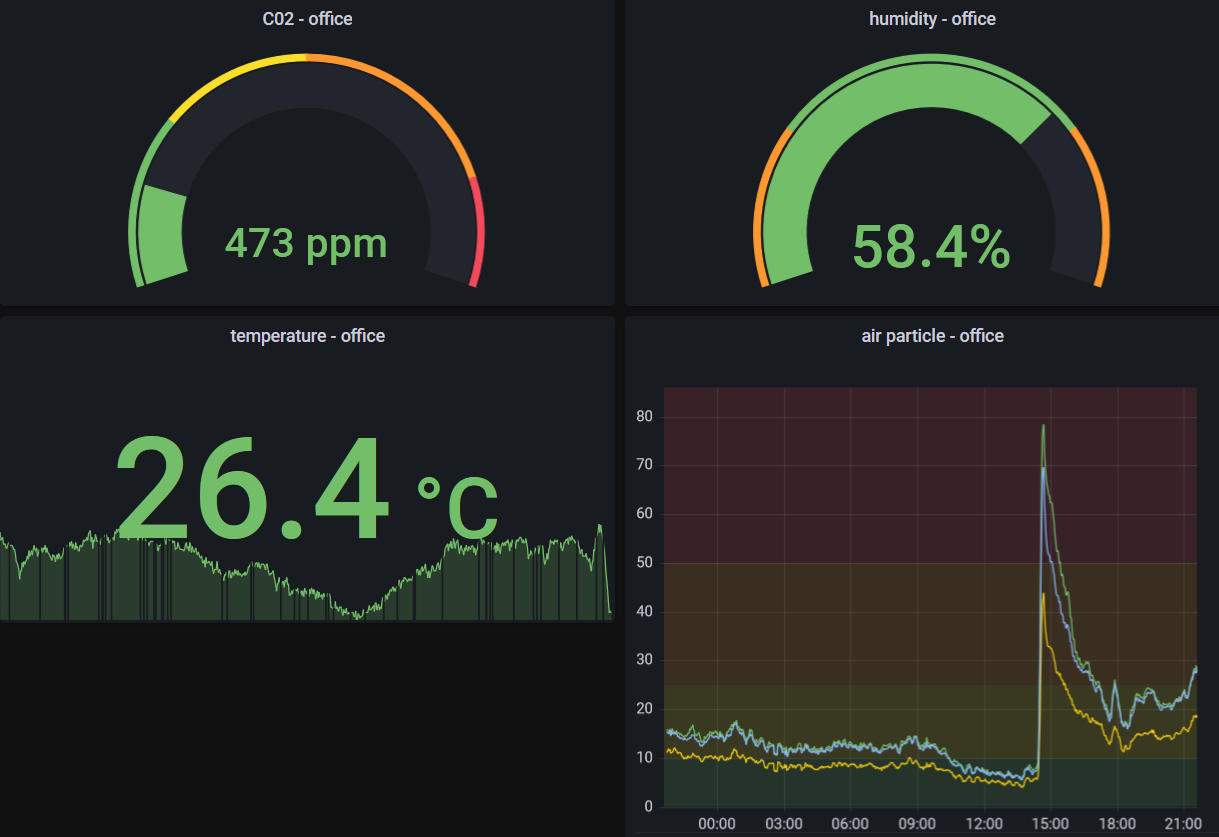
I installed Grafana and InfluxDB as Add-ons and use them to display the measured values in the Home Assistant Dashboard. In this blog post, I write about how to configure Grafana to be used as embedded dashboards for Lovelace.
Conclusion
All sensors work as expected and I had only a few outages which were my fault due to misconfiguration. Since I have them installed I keep supervising the air in our apartment frequently. Especially when working from home I monitor the CO2 level in the room to check when I need to open a window. Temperature and humidity values will become more relevant in the winter.
Currently, we live close to a harbor. In the future, I plan to investigate if there is a correlation between large ships passing by and spikes in air particle concentration. But this is a project far away in the future at the time of writing this post.